~/hub / map-wiki / shadows-of-evil

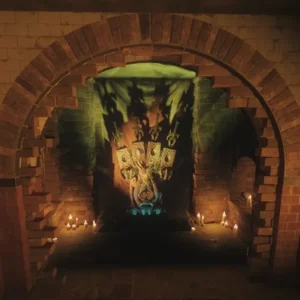
The statue holding the Apothicon Swords and eggs in the Underground, Shadows of Evil, Call of Duty Black Ops III Zombies

Shadows of Evil:
Apocalypse Averted

Apocalypse Averted, the main quest of Shadows of Evil, step by step: the Tram symbols and the Apothicon Swords, the Arch-Ovum and the Keeper swords, the flag, the capture of the Shadowman and the four-player finale against the giant Gateworm.

  • 4 min read
  • 6 chapters
  • updated

Two quests in one

The main quest of Shadows of Evil was first known as “Playing For Keeps”. It comes in two parts. Apocalypse Ascendant is the five rituals that open Pack-a-Punch and free the giant Apothicon, with the achievement The Beginning of the End. Apocalypse Averted turns the crew against the Shadowman. It gives no achievement, but a Dark Ops calling card and the Summoning Key icon on the map selection screen, one of the marks needed for the super Easter egg of Revelations.

Up to the boss fight, the quest can be done with any number of players. The last step and the ending cutscene only trigger with four players.

The Summoning Key, the five rituals and Pack-a-Punch

The Apothicon Swords

  1. Ride the Tram and look out for three symbols in red-lit windows, one when leaving each district. They change every game. Leaving the Canals: on the left, after the Devil-O-Donuts and Hotel signs. Leaving the Waterfront: on the right, in a warehouse window. Leaving the Footlight district: on the left, after the Peep Show.
  2. In the Underground, in Beast form, nine symbols surround a wall next to the Box spot and the GobbleGum machine. Shock the three seen from the Tram. A wrong set hides the symbols until the next round.
  3. The wall dissolves on a statue holding four swords and four eggs. Each player takes an egg.
  4. Break open the four tall crates with the Beast to reveal the Apothicon statues: in the Footlight alley under the perk spot, behind the front stairs of the Ruby Rabbit, in the ruined building of the Waterfront, and across from the sword statue in the Underground.
  5. Place the egg on a statue and kill about twelve zombies near it until it glows, then do the same at the three other statues. Each player charges their own egg.
  6. Put the blue egg back on the sword statue and take the Apothicon Sword, the Specialist weapon, with a name of its own for each character.

The Keeper swords

  1. At the ritual site of your character, take the Arch-Ovum from the Keeper spirit floating above the altar.
  2. Place it on one of the four red ritual circles: outside the entrance of Easy Street in the Junction, between the workbench and the Ruby Rabbit, in front of The Anvil, and in front of the Black Lace Burlesque.
  3. Margwas come, up to two in solo and four in co-op, and they only hunt the player who called them. Kill them to clear part of the egg’s shell. Their heads give no points.
  4. Repeat at the three other circles, one circle per player each round.
  5. Give the sword to the Keeper spirit of your ritual site: it comes back as a Keeper sword, whose second attack throws a floating sword that fights on its own.

Capture the flag

  1. In Nero’s apartment, use the open book on the floor by the shelves. A flag with a purple mist falls in the Underground, next to Widow’s Wine.
  2. Picking it up clears the zombies, and Insanity Elementals start to rain down. Dark purple circles on the ground hurt the players who step on them.
  3. Carry the flag to a spot of purple lightning on the ground and defend it for about thirty seconds. The Shadowman appears near it and sends Parasites. A chime tells that the spot is done, and a Max Ammo can drop.
  4. Do a second spot on the way, then bring the flag to the ritual site of that district. The Keeper spirit there becomes a real Keeper and goes down to the Underground, and a Margwa comes.
  5. Do it again for the three other ritual sites, one each round. A broken flag can be taken again from the Underground.

Capturing the Shadowman

The four Keepers now guard the Gateworm pedestals of the Pack-a-Punch room. Each player uses a pedestal and hands over their Keeper sword. Once all are in place, the Keepers break the Shadowman’s shield. The players shoot him as he teleports around the room, and he drifts toward the summoning table. Used at the right moment, the table traps him in the Summoning Key.

The room stays locked until the step is done, the zombies keep coming, and a Margwa comes each time the shield is broken. If the players are too slow, the Shadowman goes back to the middle of the room and raises his shield again. With fewer than four players, the quest ends here and the swords come back.

Averting the apocalypse

  1. A giant Gateworm appears above the Junction, where the three Tram lines meet. The zombies vanish and purple Margwas come without end. The round no longer moves on, and a player who bleeds out comes back when the Tram is called.
  2. The players are infected again and again, and have to walk through the white wisps around the map to cleanse themselves. Every Margwa killed lights up a Beast pedestal, and the Beast no longer runs out of time.
  3. Three players in Beast form shock the electric boxes high up in the three Tram stations. The rails turn blue.
  4. The fourth player calls the Tram, which runs into the giant Gateworm.
  5. While the worm is gone and the rails are still blue, the Beasts shock the three Keepers in the middle of the Junction. Their beams join and strike the giant Apothicon in the sky.

In the cutscene, the giant Apothicon disappears and a Keeper comes down with the Summoning Key. Edward Richtofen grabs it: “I’m so sorry, I really don’t have time to explain. I have a universe to set right.” He steps through a portal and is gone. The swords come back, and the Civil Protector turns gold, with a Pack-a-Punched KN-44, for the rest of the game.